ASP.NET MVC Areas: Extend your application with Areas
Areas can make your ASP.NET MVC application expand in new directions. Today, we cover how to logically partition your application using areas in ASP.NET MVC.

Once your ASP.NET MVC applications are deployed, they will start to grow. I've had a number of clients talk to me about extending the application. When you have a number of controllers and want to logically partition an application, you want to confirm your application has a logical sense of progression.
You could add a number of other controllers, but that would result in making the application even harder to understand.
For example, I had a user who wanted to add an administration section to their application. The problem was the administration controller and pages were intermingling with the actual functionality of the application and it got confusing for developers who never touched the application and was trying to find the Views for the right controllers.
It was a mess.
So today, I will discuss areas with you and how to isolate areas from the primary function of your application.
How to create Areas
Areas were first introduced in ASP.NET MVC 2.0. When I first started using them, I realized I could use Areas for an admin section for web sites. In my opinion, every website needs an administration section to manage, monitor, and mangle the content for the front page.
To create an Area, right-click on your existing ASP.NET MVC project and click 'Add' and select 'Area'.
A very plain dialog box will appear asking you to enter the name of the area. If we want to have an Administration area, we can just enter Administration into the dialog box (not AdministrationController).

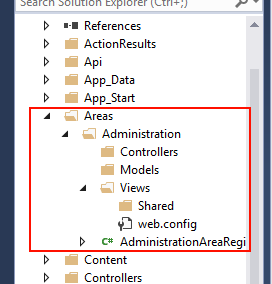
Once you confirm the name, Visual Studio will add a new folder to your project called called Areas. Under that folder will contain your Area name with the familiar Controllers, Models, and Views along with an AreaRegistration.cs file.

Now you can start building your area without worrying about the main application.
Since your area is isolated, you can do everything inside this "mini-MVC" application. To see your administration area, enter the URL:
http://localhost:xxxx/Administration/
If you look at the RegisterArea in the AreaRegister.cs file, you'll notice the following:
public override void RegisterArea(AreaRegistrationContext context)
{
    context.MapRoute(
        "Administration_default",
        "Administration/{controller}/{action}/{id}",
        new { action = "Index", id = UrlParameter.Optional }
    );
}
The Administration string is at the beginning to catch any routes that start with 'Administration'. The rest, as they say, is history. The controller, action, and id are the standard ways performing the routing.
We also don't have a controller default because the controller will be blank and the action will take over.
However, if you enter the URL above and try to go to the Administration area, you'll get an error.
What gives?!?
If you notice the folder structure in the image above, you'll see that you don't have a controller defined. There also isn't a Views/<controller> folder defined so no View can be served to the user.
Once you define your controller and View, you should be on your way to creating your area.
A couple of traps
While there isn't much explaining to do with areas, there are some gotchas that can make your life a little interesting when debugging areas.
Keep your routes to a minimum
With the ability to add numerous routes to your application, it can become a little unbearable to track down where routes send you. Once you add Area routing, your debugging may become more complicated than expected.
If you are having issues with routing, trim off routes by commenting them out temporarily from each RouteConfig.cs in your Areas and your App_Start so you can track down the routing issue.Isolate your Configs
I've heard a lot of people say they would want a separate bundling and routing for their specific area. However, they don't want to add more areas routing and bundling to their App_Start folder configs. There is a fix for this.
In your AreaRegistration.cs, configure it to look like the following:
public class AdministrationAreaRegistration : AreaRegistration
{
    public override string AreaName { get { return "Administration"; } }
    public override void RegisterArea(AreaRegistrationContext context)
    {
        RegisterRoutes(context);
        RegisterBundles();
    }
    private void RegisterRoutes(AreaRegistrationContext context)
    {
        RouteConfig.RegisterRoutes(context);
    }
    private void RegisterBundles()
    {
        BundleConfig.RegisterBundles(BundleTable.Bundles);
    }
}
As you can see, we need a RouteConfig static and a BundleConfig static. How can we call them without calling the application's BundleConfig and RouteConfig?
We use the internal keyword.
Areas/<Area>/BundleConfig.cs
internal static class BundleConfig
{
    internal static void RegisterBundles(BundleCollection bundles)
    {

    }
}
/Areas/<Area>/RouteConfig.cs
internal static class RouteConfig
{
    internal static void RegisterRoutes(AreaRegistrationContext context)
    {

    }
}
Place your bundling code and routing code into these code snippets specific to your area and they will be specific to the area without the interference of the main MVC application routing or bundling butting in. :-)
Conclusion
Areas provide a great way to build out your website without refactoring the main website. In this post, we covered how to abstract new functionality to your website using areas and discussed how to handle some interesting issues you could run into when creating areas.
The one thing you need to be aware of is that once your area is created, it can be easy to modify them from the AreaRegistration.cs file. Change the name to whatever you want. As long as it doesn't conflict with another area name, refactoring areas in an MVC application is pretty straight forward.
Did I miss anything with areas? Post your comments below and we'll get a discussion going! Thanks!


