ASP.NET MVC: Data-Driven CSS Sprites
If you want to speed up your site, you need to make a minimum amount of requests. In today's post, we'll create a dynamic sprite image based on multiple images in a database.

Back in November of 2014, Google has made it quite clear that they would be rewarding websites that are mobile-friendly.
To prepare, I started looking over the Page Insights utility that Google provides to users to confirm that everything is actually faster and mobile-friendly.
While my website was getting a checkup, I noticed that I was making six calls to pull social icons at the top and in the right sidebar.
Top Header

Sidebar Content

It seems logical that you should make one call instead of twelve calls to grab the same images.
To add to the complexity, the social icons are data-driven. I have a list of social networks in a database with images attached to them.
Why am I doing this?
I thought to myself, "I can't have this low Google score! I need to fix this."
But how?
Let me explain...
The CMS I'm using is homegrown and has a specific section for managing social networks where I regularly post.
If I want to add another social network to my list, I add the record and the graphic would automatically update itself without me loading Paint.Net and modifying a graphic every time I add a new social network.
How are you storing the data?
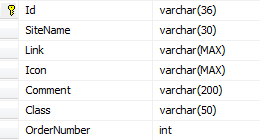
Let's start with the database and look at the record.

- Sitename is the title of the social network
- Link is the URL to the social network of choice if they click the image (i.e. http://facebook.com/DanylkoWeb)
- Icon is the relative path to the image to display
- Comment (for future use)
- Class is the CSS class attached to this record
- OrderNumber is the index for sorting our records (IMPORTANT!)
I should also mention that the images should all be the same width and the same height. I made mine 32x32 pixels.
Once you have your records in the table, it's time to look at our SpriteActionResult.
Building the SpriteActionResult
For those who don't know what a Sprite is, CSS Sprites are a way to improve performance by combining all of your small images into one big image and then using CSS to specify coordinates that position the image on the web page.
For this new action result, we need two things to make this work: the records of the sites, and content type. We pass those in through the constructor since they are required.
So let's get our ActionResult template ready.
ActionResults\SpriteActionResult.cs
public class SpriteResult : ActionResult
{
    private readonly IEnumerable<SocialSite> _sites;
    private readonly string _contentType;
    public SpriteResult(IEnumerable<SocialSite> items, string contentType)
    {
        _sites = items;
        _contentType = contentType;
    }
    public override void ExecuteResult(ControllerContext context)
    {

    }
}
When we call the ExecuteResult, we need to pull in all of the images associated with each social network record. In our case, this is the Icon field.
Once we have all of the images, we can build our graphic and return it to the browser.
Here is what our ExecuteResult looks like:
public override void ExecuteResult(ControllerContext context)
{
    var response = context.HttpContext.Response;
    var imageStream = GetSpriteImage();
    response.ContentType = _contentType;
    imageStream.Seek(0, SeekOrigin.Begin); // IMPORTANT!
    byte[] buffer = new byte[4096];
    while (true)
    {
        var read = imageStream.Read(buffer, 0, buffer.Length);
        if (read == 0)
            break;
        response.OutputStream.Write(buffer, 0, read);
    }
    response.End();
}
The GetSpriteImage() handles the generation of the graphic and returns a MemoryStream to attaches itself to the OutputStream of the Response.
Notice the imageStream.Seek that resets back to the beginning of the stream. Since we already added the images, we were at the end of the stream. If you don't reset the position back to the beginning of the stream, you'll get one big empty image.
Once we have our buffer setup, we stream the bytes out to display our image.
Image-ine a Sprite
The GetSpriteImage() combines two methods to return a graphic to us.
First, we load and create the images GetImageList() which is pretty simple. Then, we take that image list and build our sprite.
The GetSpriteFromImageList() scans through the list of images and determines the total width of the images by sum-ming them and grabbing the maximum height from all of the images. As mentioned above, we should get a (32*n)x32 image.
Next, we create our MemoryStream and start building the image. We increment x every time we draw our image on the bitmap until we are done. Then we save our image in the MemoryStream as a PNG (my preference) and return the stream.
public MemoryStream GetSpriteImage()
{
    var imageList = GetImageList(_sites);
    return GetSpriteFromImageList(imageList);
}
private MemoryStream GetSpriteFromImageList(List<Image> imageList)
{
    var width = imageList.Sum(e => e.Width);
    var height = imageList.Max(e => e.Height);
    var ms = new MemoryStream();
    using (var bmp = new Bitmap(width, height))
    {
        using (var g = Graphics.FromImage(bmp))
        {
            g.Clear(Color.Transparent);
            var x = 0;
            foreach (var image in imageList)
            {
                g.DrawImage(image, new Point(x, 0));
                x += image.Width;
            }
        }
        bmp.Save(ms, ImageFormat.Png);
    }
    return ms;
}
private List<Image> GetImageList(IEnumerable<SocialSite> sites)
{
    var results = new List<Image>();
    foreach (var socialSite in sites)
    {
        var fileName = socialSite.Icon;
        if (!fileName.StartsWith("~"))
        {
            fileName = String.Format("~{0}",socialSite.Icon);
        }
        var fileAndPath = HostingEnvironment.MapPath(fileName);
        results.Add(Image.FromFile(fileAndPath));
    }
    return results;
}
One thing I'll include are the namespaces that I used for this ActionResult. The good news is that all of the code is self-contained in this one ActionResult. You can refactor it out once it's functional.
using System;
using System.Collections.Generic;
using System.Drawing;
using System.Drawing.Imaging;
using System.IO;
using System.Linq;
using System.Web.Hosting;
using System.Web.Mvc;
Here is our final SpriteResult for our controller.
ActionResults\SpriteResult.cs
public class SpriteResult : ActionResult
{
    private readonly IEnumerable<SocialSite> _sites;
    private readonly string _contentType;
    public SpriteResult(IEnumerable<SocialSite> items, string contentType)
    {
        _sites = items;
        _contentType = contentType;
    }
    public override void ExecuteResult(ControllerContext context)
    {
        var response = context.HttpContext.Response;
        var imageStream = GetSpriteImage();
        response.ContentType = _contentType;
        imageStream.Seek(0, SeekOrigin.Begin);
        byte[] buffer = new byte[4096];
        while (true)
        {
            var read = imageStream.Read(buffer, 0, buffer.Length);
            if (read == 0)
                break;
            response.OutputStream.Write(buffer, 0, read);
        }
        response.End();
    }
    public MemoryStream GetSpriteImage()
    {
        var imageList = GetImageList(_sites);
        return GetSpriteFromImageList(imageList);
    }
    private MemoryStream GetSpriteFromImageList(List<Image> imageList)
    {
        var width = imageList.Sum(e => e.Width);
        var height = imageList.Max(e => e.Height);
        var ms = new MemoryStream();
        using (var bmp = new Bitmap(width, height))
        {
            using (var g = Graphics.FromImage(bmp))
            {
                g.Clear(Color.Transparent);
                var x = 0;
                foreach (var image in imageList)
                {
                    g.DrawImage(image, new Point(x, 0));
                    x += image.Width;
                }
            }
            bmp.Save(ms, ImageFormat.Png);
        }
        return ms;
    }
    private List<Image> GetImageList(IEnumerable<SocialSite> sites)
    {
        var results = new List<Image>();
        foreach (var socialSite in sites)
        {
            var fileName = socialSite.Icon;
            if (!fileName.StartsWith("~"))
            {
                fileName = String.Format("~{0}",socialSite.Icon);
            }
            var fileAndPath = HostingEnvironment.MapPath(fileName);
            results.Add(Image.FromFile(fileAndPath));
        }
        return results;
    }
}
Onto the SpriteController
Our SpriteController will be extremely simple now. We pull our social network records from the table and return a generated SpriteResult image.
Controllers\SpriteController.cs
public class SpriteController
{
    [OutputCache(Duration = 3600, VaryByParam = "none")]
    public ActionResult SocialImage()
    {
        var unitOfWork = ControllerContext.GetUnitOfWork<AdminUnitOfWork>();
        var records = unitOfWork.SocialSiteRepository.GetAll().OrderBy(e=> e.OrderNumber);
        return new SpriteResult(records, "image/png");
    }
}
A couple of notes:
- If you decide to use a different format instead of PNG, you would change the "image/png" to a different content type and change your MemoryStream to use a different image type (ImageFormat.PNG) in the last line of the GetSpriteFromImageList() method.
- If you compile your project and type localhost:xxxx/Sprite/SocialImage, you should see your image displayed as a single image in your browser!
- To verify it's one image, use the mouse to click and drag it. It should be a single image.
- To avoid multiple calls in generating this image, I added the OutputCache attribute and set the expiration to 1 hour. How often will you be adding a new social network, honestly?
If the GetUnitOfWork looks strange to you, please see the previous post titled ASP.NET MVC Data Layer: Access Your Data Layer Through Unique Requests.
Now let's apply the magic!
Our View will look something like this:
<ul class="list-unstyled list-inline">
    @foreach (var item in Model.SocialSites)
    {
        <li><a href="@item.Link" class="social-sprite social-site @item.Class"></a></li>
    }
</ul>
Since my site is built using Bootstrap, we use a simple unordered list using Bootstrap's list-unstyled and list-inline CSS classes.
We have two items of importance here: the url that points to the social network and the CSS class used for each network.
But where is the image?
It's in our CSS file.
.social-sprite {
    background: url(/Sprite/SocialImage);
}
.social-site {
    display: block;
    height: 32px;
    width: 32px;
}
.social-insta { background-position: 0 0 }
.social-facebook { background-position: -32px 0 }
.social-linkin { background-position: -64px 0 }
.social-twitter { background-position: -96px 0 }
.social-googlep { background-position: -128px 0 }
.social-rss { background-position: -160px 0 }
The Reveal (or the explanation)
In our CSS, the social-sprite class makes the call to our SocialImage that we built with the SpriteController.
It's just like retrieving a regular image from the server only we are fooling CSS to pull back an image from our SpriteController.
Once we have our background image, we need to set our anchor tag to display as a block instead of an inline element. We also make sure that our height and width are set for the anchor tag size. All this is doing is defining a clickable area around a background image giving the illusion that it's a clickable image (Duh!).
Finally, in our SocialSite class, we had two important properties: Class and OrderNumber.
The Class, as shown in the HTML above, refers to the CSS. This will move the image using the background position to display our 32x32 image since that's what we set our height and width to for our anchor tag (A).
Remember how I said the the OrderNumber was important?
The OrderNumber (or Index) is absolutely necessary because if you do not include an Index at all, your image order will not match up with your CSS class.
For example, if you click on Instagram and it will take you to Facebook because your CSS is positioning the background to an absolute position on the image and it may be positioning itself on a Facebook icon instead of an Instagram icon.
Conclusion
In this post, I showed you how to take a list of images and turn them into a simple sprite so you are only making one request instead of twelve.
This will remove at least two issues with Google's Page Insights: Multiple images should be combined and fewer HTTP requests are made.


