Create an Aurelia Application with ASP.NET Core 1.0, Part 2 - Navigation
In the second part of this Aurelia series, we'll focus on building the navigation for our application.

Last week was interesting after I posted my article, Create an Aurelia Application with ASP.NET Core 1.0, Part 1 - Setup.
On that same day, Aurelia 1.0 was released.
Nice timing.
Since Aurelia 1.0 came out last week, there may be some adjustments we need to make, but we'll address them as they appear and fix them.
Today, we'll focus on building the navigation for our application.
But first, a word from the developer...
Knowing Where To Hit
For those new to JavaScript frameworks may find it a bit overwhelming with a steep learning curve when building applications.
Especially with JavaScript. You always need to know where to hit.
TL;DR; Study up on your JavaScript before diving even deeper into JavaScript frameworks.
I won't lie. This is a new area for me as well, but there are a couple of observations I'm seeing with Aurelia.
- Not only is it a new type of JavaScript (ES6 with new syntax), it's also a new framework (Aurelia), new environment (JavaScript CLI tooling), and new programming style (App In A Browser). Even though I know JavaScript, this is a whole new world and different way of approaching development...in a browser...with JavaScript.
- Don't get frustrated if you don't get it right the first time because I'm experiencing the same thing you are. ;-)
- I know most MVC developers don't want to hear this, but I'm starting to compare Aurelia to WebForms, making it a little easier to understand.
As I continue to work with Aurelia, I'll be posting more observations.
Now, on to building our Aurelia app.
Need an Update
With Aurelia 1.0 out, we need to update our library.
- Open a command prompt in your project directory.
- Based on the project from the last post, all you should need to do is type
jspm updateand you should see Aurelia was updated to 1.0 at the end of the process.
This should update all of your Aurelia libraries to 1.0.
Along with this update, we do need a couple more libraries for this project, but let's focus on the basics with Aurelia for now.
Initial Application Structure
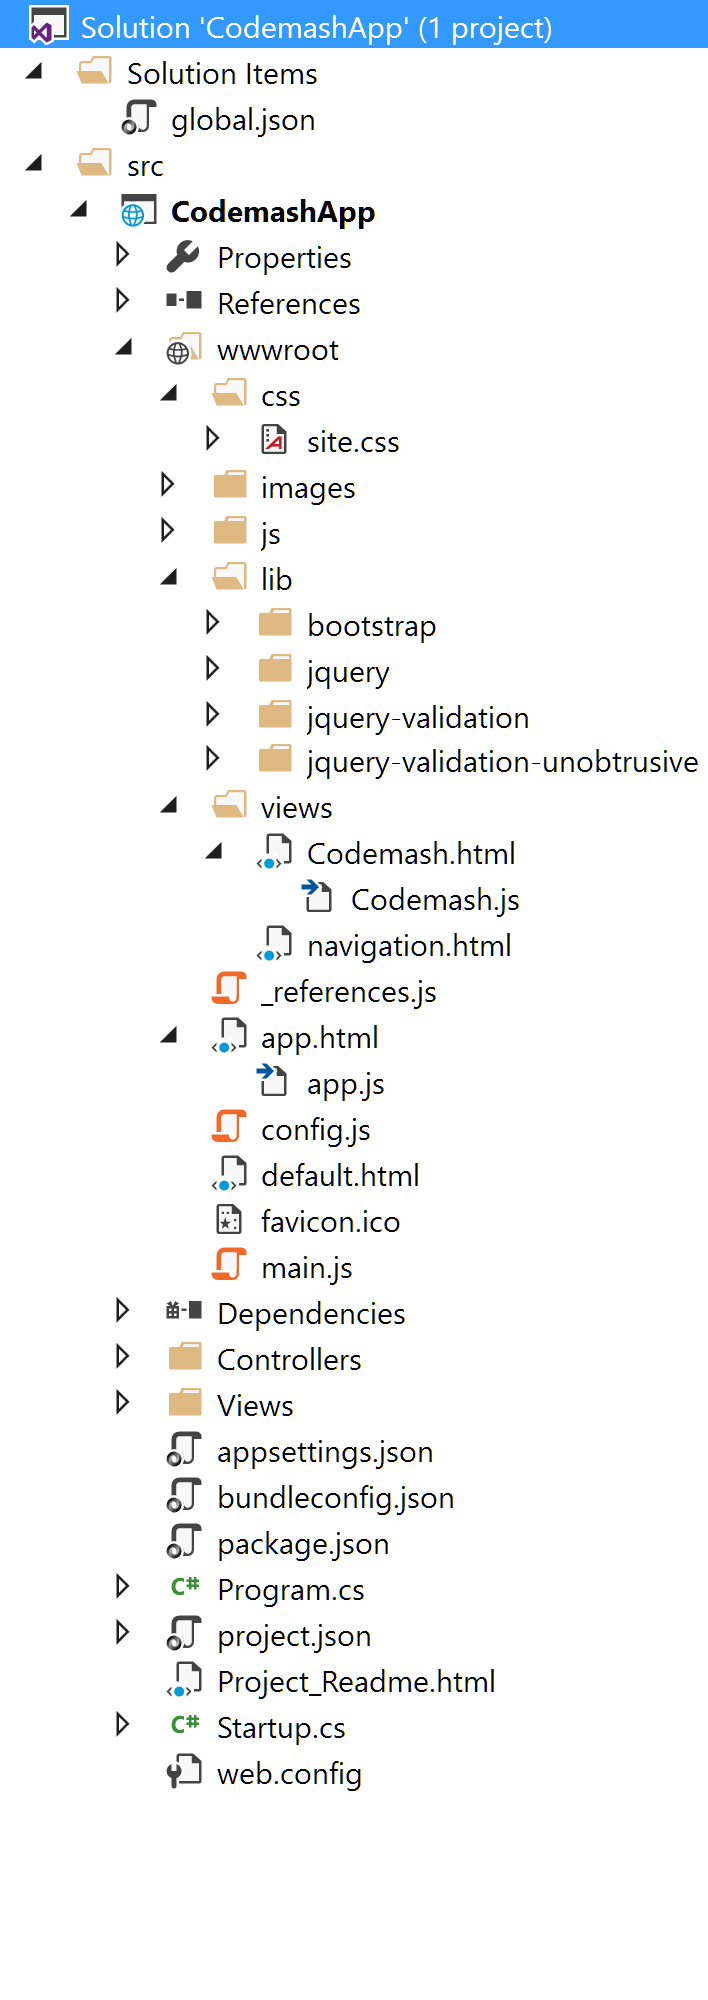
One possible structure of an Aurelia application inside an ASP.NET MVC application could look like this.

The only reason I included MVC in this project was for the Web API aspect that we'll touch on in a later post.
For now, let's discuss the different file types in the project.
As you know, we created a default.html and this is our Aurelia Bootstrapper. This page provides the essentials to kick off the application.
If you notice the body tag, you'll see an aurelia-app attribute. The default setting is "app" which loads an app.html/app.js pairing, but you can add aurelia-app="src/mynewapp" and it will load and execute that instead.
wwwroot/default.html
<!DOCTYPE html>
<html>
<head>
    <title>Aurelia</title>
    <meta name="viewport" content="width=device-width, initial-scale=1">
</head>
<body aurelia-app>
    <script src="jspm_packages/system.js"></script>
    <script src="config.js"></script>
    <script>
        SystemJS.import('aurelia-bootstrapper');
    </script>
</body>
</html>
Just like any web page, we need to have an index.html, default.html, default.aspx or whatever page is your platform's default. This is the primary entry point to kick off your application.
We also have a system.js which allows us to use dynamic module loading of JavaScript (as you can see with the SystemJS.import()).
Another file we need for our Aurelia application is the main.js.
wwwroot/main.js
export function configure(aurelia) {
    aurelia.use
      .standardConfiguration()
      .developmentLogging();
    aurelia.start().then(() => aurelia.setRoot());
}
This is where we can specify and load plugins, define the configuration, and add other features to our Aurelia application. For now, we'll set up the standard configuration and development logging.
Think of this as your Startup.cs in the new ASP.NET Core project only a JavaScript version of your Middleware.
Adding Additional Libraries
As I mentioned, we are using the Jasny bootstrap library for the sliding menu. How do we add that to our Aurelia app?
If you want to add any library, you can grab it easily from GitHub by typing:
jspm install jasny=github:jasny/bootstrapWith the prefix github, you can install any github library into Aurelia. See the 'jasny='? This is the name you include in your main.js.
Oh, we also need font-awesome as well.
jspm install fontawesome=github:FortAwesome/Font-AwesomeWhoops! Almost forgot about jQuery for the Jasny Bootstrap library.
jspm install jqueryNext, we can include our imports of these libraries in our main.js file (changes in bold)
wwwroot/main.js
import 'bootstrap';
import 'fontawesome';
import 'jasny';
export function configure(aurelia) {
    aurelia.use
      .standardConfiguration()
      .developmentLogging();
    aurelia.start().then(() => aurelia.setRoot());
}
We also need to modify our bootstrapper default.html file to include our JavaScript libraries.
wwwroot/default.html
<!DOCTYPE html>
<html>
<head>
    <title>Aurelia</title>
    <meta name="viewport" content="width=device-width, initial-scale=1">
</head>
<body aurelia-app>
    <script src="jspm_packages/system.js"></script>
    <script src="config.js"></script>
    <script>
        SystemJS.import('aurelia-bootstrapper');
        SystemJS.import('jquery');
        SystemJS.import('bootstrap');
        SystemJS.import('jasny');
    </script>
</body>
</html>
Now that our libraries are defined, we can work on the navigation for the app.
We Need To Route!
Our app.html/app.js is our host with a router attached to it. The navigation.html is taken from the previous code and modified to work with Aurelia.
For starters, we need a page to introduce the application. Let's set up a dummy one. Our app.html and js now looks like this.
wwwroot/app.html
<template>
    <require from="./css/site.css"></require>
    <require from="./views/navigation.html"></require>
    <require from="./lib/bootstrap/dist/css/bootstrap.css"></require>
    <require from="./jspm_packages/github/jasny/bootstrap@3.1.3/css/jasny-bootstrap.min.css"></require>

    <navigation router.bind="router"></navigation>

    <div class="page-host">
        <router-view></router-view>
    </div>
</template>
wwwroot/app.js
export class App {

    configureRouter(config, router) {
        config.title = 'Codemash App';

        config.map([
          { route: ['','codemash'], name: 'codemash', moduleId: './views/Codemash', nav: true, title:'Home'}
        ]);

        this.router = router;
    }
}
The app.html has some...interesting ways of writing HTML. ;-)
- First, the navigation.html can be represented as a tag element (navigation). That functionality is out of the box. The only thing I added was a file and that filename became an element.
- Next, the require tags are similar to your link tags defining your CSS for the application.
- If a router is defined in the model (I still think it feels like "code-behind"), a router-view element is required to display your "navigation view." This reminds me of the @RenderBody() in ASP.NET MVC. Wherever that <router-view> tag is at, that is where your screens will appear.
In our app.js, the configuration and router are injected into the configureRouter method and we define our map.
The config.map has one important section to observe. It's the moduleId. The moduleId is the path to the view that we want to display on the page. Since we only have one page, we'll add this for now.
We also save the router in a property for later use.
Finally...The Navigation!
If you remember the navigation on the client-side, we had the following HTML:
<nav id="codemashMenu" class="navmenu navmenu-default navmenu-fixed-left offcanvas" role="navigation"> <span class="navmenu-brand">Menu</span> <ul class="nav navmenu-nav"> <li><a href="@Url.AllSessionsUrl()"><i class="fa fa-2x fa-users fa-fw"></i> All Sessions</a></li> <li><a href="@Url.AllSpeakersUrl()"><i class="fa fa-2x fa-bullhorn fa-fw"></i> All Speakers</a></li>
.
. </ul> </nav>
<div class="navbar navbar-default navbar-fixed-top"> <i class="fa fa-bars fa-2x pull-left" data-toggle="offcanvas" data-target="#codemashMenu" data-canvas="body"></i> <img src="http://www.codemash.org/wp-content/themes/codemash/images/codemash-icon.png" class="pull-left img-fluid" alt="Codemash logo" data-toggle="offcanvas" data-target="#codemashMenu" data-canvas="body" /> <span class="heading">Codemash <span class="small">2.0.1.5</span></span> </div> <div class="container-fluid body-content"> <div class="row"> @RenderBody() </div> <footer> <p>© @DateTime.Now.Year - Built for Codemash</p> </footer> </div>
Examine the MVC View and you'll notice that when we're done, the @RenderBody becomes the <router-view> for all of the views in our app.html. It's very similar to the MVC way of doing things, only we're using JavaScript.
For the navigation, luckily all we need are the two navigation items from the top. We'll place those into our navigation.html.
wwwroot/views/navigation.html
<template bindable="router">
    <nav id="codemashMenu" class="navmenu navmenu-default navmenu-fixed-left offcanvas" role="navigation">
        <span class="navmenu-brand">Menu</span>
        <ul class="nav navmenu-nav">
            <li><a href="#"><i class="fa fa-2x fa-users fa-fw"></i> All Sessions</a></li>
            <li><a href="#"><i class="fa fa-2x fa-bullhorn fa-fw"></i> All Speakers</a></li>
            <li><a href="#"><i class="fa fa-2x fa-calendar fa-fw"></i> Pre-Compiler (Tuesday)</a></li>
            <li><a href="#"><i class="fa fa-2x fa-calendar fa-fw"></i> Pre-Compiler (Wednesday)</a></li>
            <li><a href="#"><i class="fa fa-2x fa-calendar fa-fw"></i> Conference (Thursday)</a></li>
            <li><a href="#"><i class="fa fa-2x fa-calendar fa-fw"></i> Conference (Friday)</a></li>
            <li><a href="#"><i class="fa fa-2x fa-list-ol fa-fw"></i> My Agenda</a></li>
        </ul>
    </nav>
    <div class="navbar navbar-default navbar-fixed-top">
        <i class="fa fa-bars fa-2x pull-left" data-toggle="offcanvas" data-target="#codemashMenu" data-canvas="body"></i>
        <img src="http://www.codemash.org/wp-content/themes/codemash/images/codemash-icon.png"
             class="pull-left img-fluid" alt="Codemash logo" data-toggle="offcanvas"
             data-target="#codemashMenu" data-canvas="body" />
        <span class="heading">Codemash <span class="small">2.0.1.5</span></span>
    </div>
</template>
In our template, you'll notice we have to bind the router to the template. This exposes the router property to the view which allows us to perform actions using the router.
I know I'm way off with the hard-coded urls (yeah, a hashtag), but I want to explain something with the router. The router is how you get around throughout your application and it's very important. As I understand it, it's quite possibly the most important piece of an Aurelia app.
In our app.js code, we saved the router in a property so we could use it later. Well...now it's later.
In Aurelia, you can loop through all of the items in the router and display them in your HTML with a for..next syntax. Since we just have one screen, we can implement the Url and home page in the navigation (navigation.html).
<nav id="codemashMenu" class="navmenu navmenu-default navmenu-fixed-left offcanvas" role="navigation">
    <span class="navmenu-brand">Menu</span>
    <ul class="nav navmenu-nav">
        <li repeat.for="row of router.navigation">
            <a href.bind="row.href"><i class="fa fa-2x fa-fw"></i> ${row.title}</a>
        </li>
    </ul>
</nav>
How about that?! Less code with more impact!
The router property is exposed from the app.js file and provides us the list of navigation elements for our menu.
Another interesting tidbit in this piece of code is the href.bind.
What the heck is this?
This allows us to bind any HTML attribute to a JavaScript property in our model. Since we are using navigation and it automatically generates the href, we can access it and place it into the href attribute.
Of course, we also have the title which is represented by a ${row.title}.
Convenient, no?
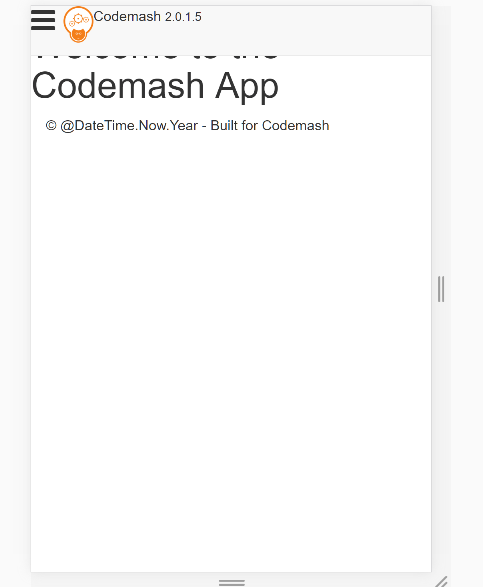
The Results
While it's not very sexy (missing some CSS styles), let's see what we've built so far.

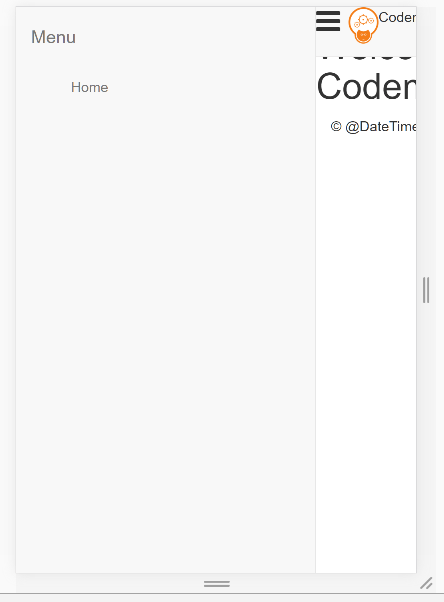
And when we click on the hamburger (the three lines in the top left corner), we get the menu sliding out (thanks to Jasny).

Not bad for a first-timer to Aurelia.
Conclusion
With Aurelia, your application can be as simple or as complex as you want it and Aurelia seems to handle it quite well.
Over the past 4 months, something must've stuck in my head as I kept reading about Aurelia. During this entire process of two hours (and four hours writing this post), I only had to look up one aspect as to how Aurelia loads an external JavaScript library into the system.
Once I figured that out and based on everything I've learned about the framework, I think I'm on my way.
But I haven't got to the screens or API section yet.
Stay Tuned! We'll talk about Web Services in Aurelia next.
Have you played with Aurelia yet? Do you think it's easy to use? Or difficult? Which part do you think is easy? Post your comments below.


