Creating User-Specific Dashboards
As a final post for this entire series, we'll look at creating dashboards for individual users

What's Next?
- Introducing Tuxboard
- Layout of a Tuxboard dashboard
- Dashboard Modularity using Tuxboard
- Moving Widgets in Tuxboard
- Creating a Tuxbar for Tuxboard
- Managing Layouts in Tuxboard: Simple Layout Dialog
- Managing Layouts in Tuxboard: Advanced Layout Dialog
- Adding Widgets with a Tuxboard Dialog
- Using Widget Toolbars (or Deleting Widgets)
- Creating User-Specific Dashboards
- Creating Default Dashboards using Roles
- Creating Default Widgets using Roles
- Creating Custom Tuxboard Widgets
Full examples located at Tuxboard.Examples.
In the last post, we demonstrated how to use the widget toolbar with capabilities to remove and minimize a widget.
While all of the features we covered in past examples are great, it's only a single dashboard allowing multiple people to add and remove widgets. In real-life, there would be no reason to even create a dashboard like this because multiple users could manipulate that one dashboard causing absolute chaos with "cats and dogs living together...mass hysteria!"
The purpose for building these simple dashboards was to provide examples so fellow developers could see it in action locally.
In today's post, we'll build on what we previously created and give users their own personal dashboard when they log on.
With everything we've done so far, it wouldn't be efficient to type everything in again. The good news is everything is already built for us and we can easily transition our dashboard to a user-based dashboard project.
Let's get started.
Creating the Project
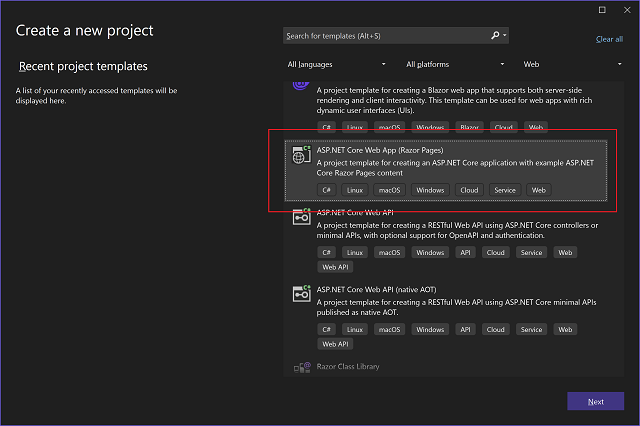
To start, we need to create an ASP.NET Core Web App (Razor Page) by clicking New > Project in Visual Studio.

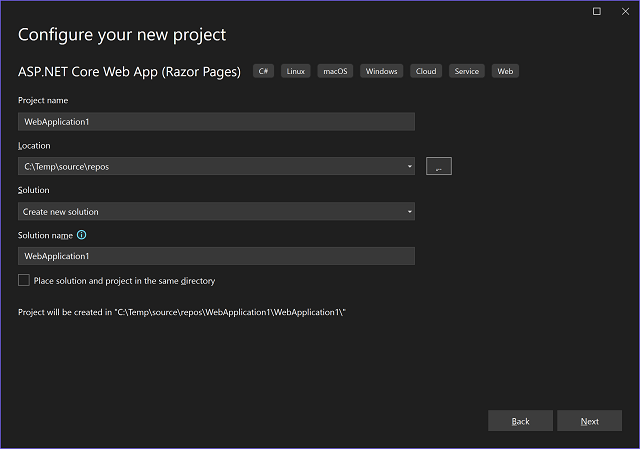
After clicking Next, enter the specifics of the project.

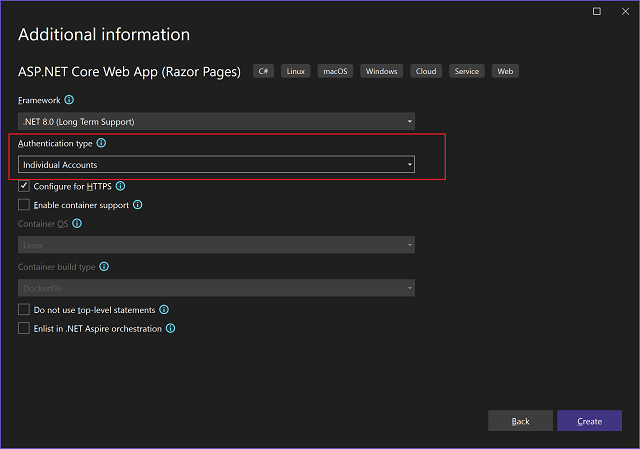
For this example, we'll select the "Individual Accounts" option for the AuthenticationType on the "Additional Information" screen.

Click Create.
The boilerplate gives us a project template which uses MS Identity for logging individuals into the system. The whole reason to use MS Identity is to associate an ID with a user. We could even replace MS Identity with another authentication/authorization library like Azure Entra authentication. The User ID for Tuxboard is a GUID.
If we look at the project, we can see the folder structure contains the Identity Data\Migrations folder with an ApplicationDbContext. Pretty standard.
Next, change the appsettings.json to point to a localhost instance of SQL Server as shown below. Replace "<DatabaseNameHere>" with your database name.
{
  "ConnectionStrings": {
    "DefaultConnection": "Data Source=localhost;Initial Catalog=<DatabaseNameHere>;Integrated Security=True;MultipleActiveResultSets=True;TrustServerCertificate=True"
  },
  "Logging": {
    "LogLevel": {
      "Default": "Information",
      "Microsoft.AspNetCore": "Warning"
    }
  },
  "AllowedHosts": "*"
}
Once we have the appsettings.json updated, we can update the database through the Package Manager Console (View > Other Windows... > Package Manager Console).
Update-Database -Context ApplicationDbContext
After hitting enter, our Identity tables should exist in SQL Server.
Adding Tuxboard
Once we have our Identity tables in place, we can add Tuxboard through NuGet to create those tables.
Add Tuxboard to the project through NuGet (Tools > NuGet Package Manager > Manage NuGet Packages for Solution...). The package is called Tuxboard.Core and the version as of now is 1.6.5.
Once Tuxboard is included, we need to add a migration and update the database, but first, we need to update our appsettings.json to include Tuxboard settings. Add the following to the appsettings.json file.
.
.
"TuxboardConfig": {
  "ConnectionString": "Data Source=localhost;Initial Catalog=<DatabaseNameHere>;Integrated Security=True;MultipleActiveResultSets=True;TrustServerCertificate=True",
  "Schema": "dbo"
},
After updating the settings, now we can add the migration and update the database. To add the migrations, type the following into the Package Manager Console.
add-migration Initial -Context TuxDbContext -OutputDir Data\Migrations\TuxboardContext
The migrations for Tuxboard were placed in it's own directory below the Data\Migrations folder using the -OutputDir parameter.
Once the migration finishes, we can update the database.
Update-Database -Context TuxDbContext
If the connection string in the appsettings.json is the same as the DefaultConnection, the tables will be added to the database. Based on the appsettings.json, the update-database command will use the TuxboardConfig:ConnectionString to create the schema.
After the tables are created, we can move on to the transitioning code over to the project.
Creating the Dashboard (or not)
At this point, we have two options: we can create a dashboard from scratch or reuse one of our previous examples and copy the code over.
If building a dashboard from scratch, begin building your dashboard adding the features you want and jump down to the next section for code changes for users.
This section will explain all of the moving pieces to copy from one project to another to confirm the dashboard works as expected.
For this project, we'll use the same files from the 08-Widget-Toolbar project since it's a culmination of everything we've worked on so far.
- Copy the following files/folders over:
wwwroot/scss(CSS folder)wwwroot/src(TS/JS folder)wwwroot/tsconfig.json(file)/Dto(C# folder)/Extensions(C# folder)/Helpers(C# folder)/Models(C# folder)/Pages/Shared/Components(C# folder)
- Copy
/gulpfile.jsand/package.jsonto the root of your project- Right-click on the
package.jsonfile andRestore Packagesto make sure thegulpfile.jswill run during the build process.
- Right-click on the
- For all of the C# folders above, change to the project's namespace instead of
08-Widget-Toolbar. - In the
Pages/_viewImports.cshtml, confirm TagHelpers are registered based on your project name.
@addTagHelper *, <your-project-name-here>
- In the
Program.cs, add your tuxboard configuration and DbContext
// Tuxboard Configuration var appConfig = new TuxboardConfig(); builder.Configuration .GetSection(nameof(TuxboardConfig)) .Bind(appConfig);
// Tuxboard DbContext builder.Services.AddDbContext<TuxDbContext>(options => { options.UseSqlServer(appConfig.ConnectionString, x => x.MigrationsAssembly("09-User-Dashboard")); }); - Also in the
Program.cs, add the dependency injection as well
// For Dependency Injection
builder.Services.AddTransient<IDashboardService, DashboardService>();
builder.Services.AddTransient<ITuxDbContext, TuxDbContext>();
- Update the
Index.cshtmlandIndex.cshtml.csfile with code from the 08-Widget-Toolbar project. - Update the
_Layout.cshtmlto include Bootstrap and FontAwesome CSS and JavaScript files.
<link rel="stylesheet" href="~/lib/bootstrap/css/bootstrap.min.css" />
<link rel="stylesheet" href="~/lib/fontawesome/css/all.min.css" />
.
.<script src="~/lib/bootstrap/js/bootstrap.bundle.min.js"></script> <script src="~/js/dashboard.min.js"></script>
After all of these changes are copied over from the previous project, running the project will present us with the generic dashboard.
Now that we have a dashboard and MS Identity both in one project, we need to connect the two.
Getting Personal[-ized]
The great part about using Identity (or Entra) is the ability to know who a user is when they sign in. To tie everything together, we need a way to identify the user and retrieve their dashboard.
First, in the Index.cshtml.cs file, we create the GetIdentity() method to retrieve the user ID.
private Guid GetIdentity()
{
    var claim = User?.FindFirst(ClaimTypes.NameIdentifier);
    return claim != null
        ? new Guid(claim.Value)
        : Guid.Empty;
}
The GetIdentity() method will be used exclusively throughout each each method.
If a user is logged in, we locate the ID by finding the NameIdentifier claim and returning it's value.
If there isn't a logged in user, we simply return an empty Guid.
With this simple method in place, we can now identify the user and retrieve their personal dashboard.
The OnGet() method in the Index.cshtml.cs becomes extremely simple now.
public async Task OnGet()
{
    var id = GetIdentity();
    if (id != Guid.Empty)
    {
        Dashboard = await _service.GetDashboardForAsync(_config, id);
    }
}
If we don't know who the user is, don't retrieve a dashboard and dashboard will be null.
Throughout all of the Index dashboard code, we can now replace:
var dashboard = await _service.GetDashboardAsync(_config);
with this.
var id = GetIdentity();
var dashboard = await _service.GetDashboardForAsync(_config, id);
Essentially, all we're doing In the Index.cshtml.cs file is replacing all GetDashboardAsync(_config) with GetDashboardForAsync(_config, id).
Now, for every user who logs in, they'll have their own dashboard.
You Get a Dashboard, You Get a Dashboard...
Throughout these examples, we make a call to retrieve a dashboard.
At first, we were using GetDashboardAsync() and for those who aren't asynchronous yet, there is also a synchronous call called GetDashboard().
Now we're switching gears and using GetDashboardForAsync() (and GetDashboardFor() for synchronous calls).
Here's the process when a GetDashboardXxxx() method is called.
If GetDashboardAsync() or GetDashboard() is called, these aren't user-specific and it will load a dashboard from the database where the user is null. If there isn't a dashboard in the database at the time, it will create a brand new one with defaults (which we'll get to in a future post).
If GetDashboardForAsync() or GetDashboardFor() is called with a user ID, the same thing will occur: it will create a brand new dashboard if one doesn't exist and assign a user ID to it. If there is an existing dashboard for this user, it'll load it.
Basically, every GetDashboardXxxx() call will always return a dashboard.
With that said, I return you to your regularly scheduled (dashboard) programming...
Displaying the Dashboard
When a user isn't logged in, we shouldn't display a dashboard. Without a dashboard's data, we'll break some of our ViewComponents.
The two ViewComponents we need to update are the Tuxbar and the Tuxboard Template.
Remember in our code how the Dashboard property is set to null at the top of our index.cshtml.cs?
public Dashboard Dashboard { get; set; } = null!;
Let's add another property called HasDashboard.
public bool HasDashboard => Dashboard != null;
This provides an easy way to identify whether a user has a dashboard or not. If they are logged in, they should have a dashboard (based on our previous section).
In the Index.cshtml, we can use this new property to add a heading for users not logged in.
<h3 class="text-center" condition="!Model.HasDashboard">Register or login to view your dashboard.</h3>
But what about our ViewComponents? What if there isn't a dashboard model for our Tuxbar or TuxboardTemplate ViewComponent?
We can't really apply a condition TagHelper inside another TagHelper (a drawback in my eyes), but we can examine the model passed into each ViewComponent. Let's look at the TuxboardTemplateViewComponent first.
[ViewComponent(Name = "tuxboardtemplate")]
public class TuxboardTemplateViewComponent : ViewComponent
{
    public IViewComponentResult Invoke(Dashboard model)
    {
        return model == null
            ? Content(string.Empty)
            : View(model);
    }
}
Since we pass the Dashboard property into the ViewComponent, we can determine whether a user is logged in or not.
If they aren't logged in (model is null), no content is returned. If they are, they'll see their dashboard.
Oh...and they'll see their Tuxbar if they're using one. We'll need to apply the same logic to our Tuxbar ViewComponent so it has the same return result.
[ViewComponent(Name = "tuxbar")]
public class TuxbarViewComponent : ViewComponent
{
    public IViewComponentResult Invoke(Dashboard model)
    {
        return model == null
            ? Content(string.Empty)
            : View(model);
    }
}
The empty content is also a way to visually show if something is wrong if a dashboard model isn't passed into the ViewComponent.
The Final Result
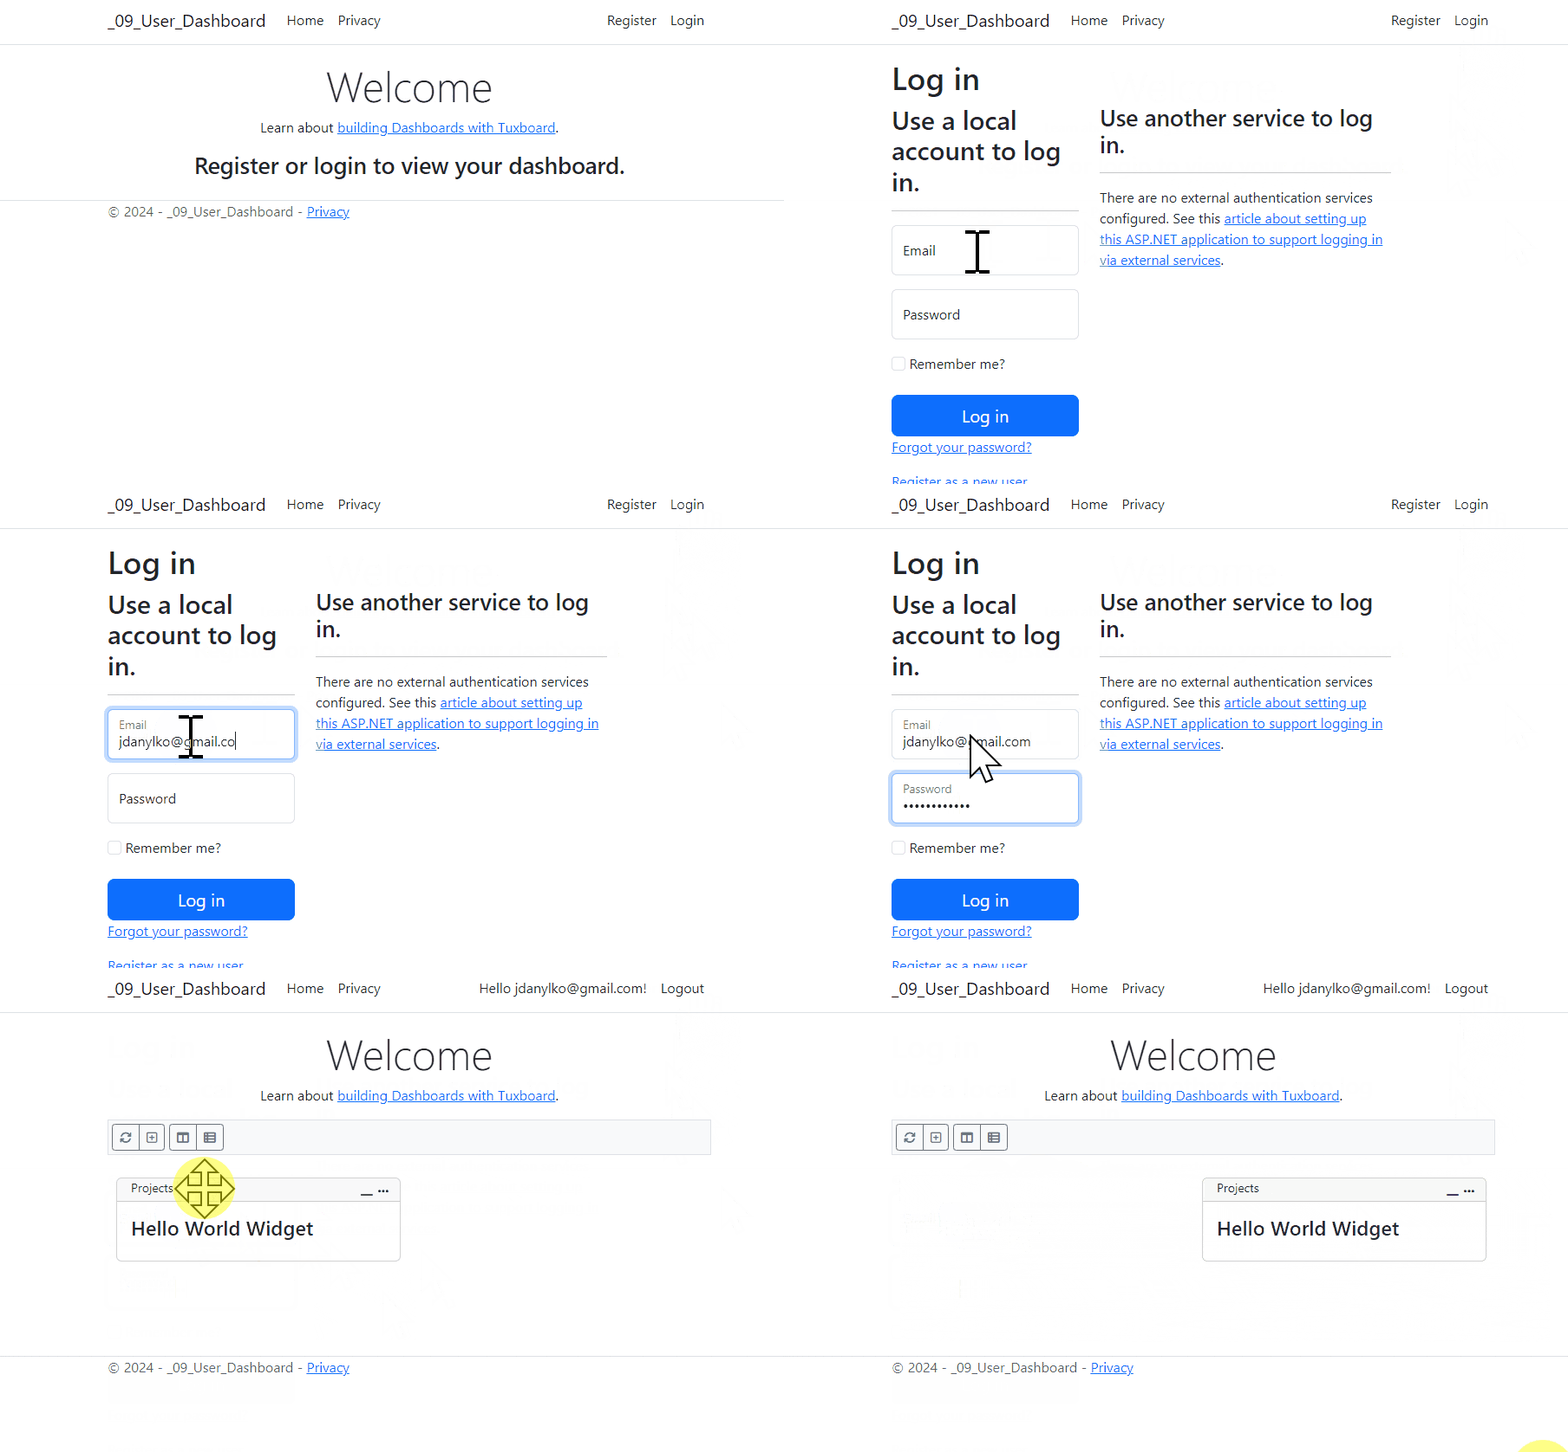
With everything in place, we can now register users and each user can have their own dashboard.

Conclusion
All of these core examples in the past have led us up to this moment where users can create their own dashboards. While some of these features/examples are bells and whistles, a majority of these example provide a collection of fundamental stepping stones into how users are empowered to create their own workspaces and examine data in various ways. They want to personalize their dashboard based on how they work.
Today's post covered how to create those user-specific dashboards giving users the freedom to experiment with their layouts.
Everything from this point forward will be considered extras, features, and supporting posts to expand and enhance Tuxboard dashboards even further.
What's Next?
- Introducing Tuxboard
- Layout of a Tuxboard dashboard
- Dashboard Modularity using Tuxboard
- Moving Widgets in Tuxboard
- Creating a Tuxbar for Tuxboard
- Managing Layouts in Tuxboard: Simple Layout Dialog
- Managing Layouts in Tuxboard: Advanced Layout Dialog
- Adding Widgets with a Tuxboard Dialog
- Using Widget Toolbars (or Deleting Widgets)
- Creating User-Specific Dashboards
- Creating Default Dashboards using Roles
- Creating Default Widgets using Roles
- Creating Custom Tuxboard Widgets
Full examples located at Tuxboard.Examples.


